
PFSense 6100 — Getting Started
My initial configuration of a Netgate 6100 and PFSense
This is a continuation of posts on Network Security
In the last post I showed you how to direct all DNS requests to your preferred DNS servers.
Redirect IoT Devices to Preferred DNS
As noted that post did not include DNS over HTTPS (DoH) and you would need to deal with that separately or block it.
Now I am testing out the PFSense 6100. Other Netgate security appliances will be similar. I’m going to go through what I did to initially set it up step by step — to a point. This is part one of more posts to follow.
About the Netgate 6100
If you want to see a great video explaining the features available on the Netgate 6100 check out this video:
https://medium.com/media/0ca90ff83de24ddd2b49d3769faa7d05/href
Considerations when setting up a new network devices
I don’t want to just broadly open this up to the Internet without being able to inspect the traffic. I wrote about that here:
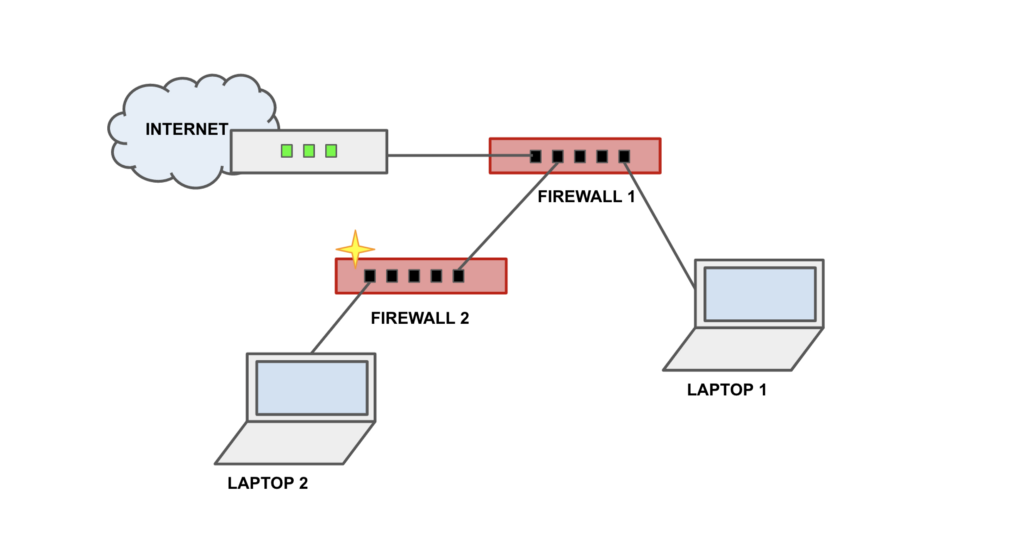
I restrict access to the mananagement port to a physical connection on a single port. I can’t be physically connected to my two firewall devices at once from a single ethernet port on my laptop.
I’m going to see if I can plug in a network cable to two separate computers and monitor that way.
Connect LAPTOP 1 to the management port on FIREWALL 1.Open the firewall logs on FIREWALL 1 and verify you can inspect the traffic.
Now I’m going to fire up the second laptop and plug it into one of the ports on the firewall one so I can inspect the traffic that the device generates.
Connect LAPTOP 2 to the first LAN port on the 6100 (FIREWALL 2).
Netgate has a picture here of the different ports with the LAN ports as #5:
https://docs.netgate.com/pfsense/en/latest/solutions/netgate-6100/io-ports.html
Netgate 6100 Security Gateway Manual – Input and Output Ports | Netgate Documentation
Plug in FIREWALL TWO WAN port 1 (#2 RJ-45 above) into the appropriate port on FIREWALL 1.Plug in the device.If you want to see the traffic before you allow it, you can block all traffic on the port to which you connect the new firewall. (Not sure what havoc this will wreak…we’ll find out.)Inspect the traffic.
Now in my last post I used two different vendors to perform this test which would be a better test, but I’m not performing a complete security assessment of this product. I just want to see what it’s up to when I plug it in.
I see two things.
Checking for Internet access I’m guessing using ICMP.DNS traffic going to some host other than my configured DNS servers.
The first thing I want to do is have the firewall use CloudFlare for DNS. Let’s see if I can login into it now. As with most routers the IP address should be: 192.168.1.1. I had already configured FIREWALL 1 to a different IP address so there should be no conflict, and my LAPTOP2 is also connected directly to FIREWALL2.
It is unfortunate that pfsense still uses a common username and password. This is another reason not to connect it directly to the Internet on initial start up but rather have it behind another device. Most device manufacturers are now publishing a unique password for each device and it appears on a sticker on the device. Some laws will soon be enforcing this. Hopefully newer devices from Netgate will make that change.
Initial Configuration
Go through the PFSense wizard to initially configure the device.
Navigate to https://192.168.1.1
Netgate 6100 Security Gateway Manual – Initial Configuration | Netgate Documentation
Follow the prompts.Change your DNS servers to CloudFlare if you like.
Easy DNS Change To Prevent Attacks
Change the time servers from something other than the default NTP pool if you like. For example, you might choose to use NIST ntp servers at time.nist.gov.Change the username and password.Do not check for updates because we still have some networking blocked.Do not change the IP address. When I did that I couldn’t log into the device anymore. I’m not sure if that was due to the particular IP address I chose.
Make a note of all that because if you’re like me you’ll forget the password later. 😀 Store your passwords somewhere secure obviously.
Test your new login and configuration changes
Test access with your new configuration to make sure you can still get to FIREWALL2 from LAPTOP2 and your new user name and password works. No point in redoing all your configuration all over again if something goes wrong with that.
Initially I changed the IP range for the device and locked myself out. I reset the device and started over since I hadn’t done much.
Resetting the 6100 in case of initial misconfiguration
The reset instructions are not exactly clear. Where is the reset button? A picture would be helpful. It’s on the side of the box and it’s the top indented button that you can press in. Don’t press too hard because I’ve had a Ubiquiti network device reset button break on me. I tested this one and you don’t have to push hard to get it to work. Besides that the instructions are adequate to return to factor reset if you can’t login.
Netgate 6100 Security Gateway Manual – Factory Reset Procedure | Netgate Documentation
Console Access ~ if you get locked out of the web UI
If you lock yourself out of the web UI due to a misconfigured firewall rule at any point, instead of starting over, you can use console access to revert to a prior configuration. You’ll need to read through the documentation here and install the appropriate driver for your system.
I use a serial connection and the screen command on a Mac described here:
Hardware – Connect to the Console | pfSense Documentation
Adding the Aliases
Now that we have our firewall up and running we can restore the aliases from another device as I explained in a prior post I’m going to do that before I connect to the Internet.
Backup and Restore PFSense Aliases
In order to get my rules over to the machine where I’m connected to the PFSense I just emailed the files to myself, connected to Wi-Fi, logged into email and grabbed the files, then got off Wi-Fi again. You might have a better solution but that worked for me.
Add Firewall Rules
Now I could try to restore the firewall rules on my other device, but the problem with that is that this device doesn’t have the same interface names or even the same number of interfaces. For this reason I’m going to manually set up my firewall rules on this device.
The first thing I’m going to do is add a default deny rule to each interface and explicitly only allow the traffic I want to pass on that interface.
I’m going to add rules to block the most egregious offenders using my aliases as explained in other posts. You can find all my network posts here.
One of the things I like about the 6100 is that the ports are discrete by default. I had to configure that on the 3100 to prevent traffic from being allowed between different ports. I need to test this further once I get the device set up.
Add rules to access the PFSense Console and remove the Auto-Lockout Rule
One of the things that I don’t like about the PFSense Auto-Lockout Rule that ensures you don’t lock yourself out. I like to have a bit more control over that rule. However, if you do that you risk locking yourself out. You can then use the console and roll back to a previous configuration or reset the device.
Backup and Recovery – Restoring from Backups | pfSense Documentation
Disable storing the username and password in the browser
Go to System > Advanced > Admin Access. Uncheck this box.
Disable IPv6
I choose to disable IPv6. You can read more about that here:
Redirect all DNS traffic to preferred DNS servers
If you’re like me and don’t want to create a bunch of different rules for devices that have minds of their own when it comes to DNS traffic you may want to redirect all that to your preferred DNS servers before you open up traffic to the Internet. I wrote about that here:
Redirect IoT Devices to Preferred DNS
You can also set up rules to redirect ICMP traffic. This may break a few things so you’ll have to test it out for each different device for which you end up redirecting traffic.
Disable DNS Resolver
You may or may not want to do this but I disable the DNS Resolver. Some of the other settings I’ve described here won’t work unless you disable this.
There are pros and cons to doing that — maybe a topic for another post.
Check the firewall logs — create a rule for DHCP traffic
Configuring the firewall enabled some new functionality.
Check the firewall logs again to see what we have now.Create a rule to allow DHCP traffic
Now that I’ve configured the device I can see that port 67 is blocked. That’s used for DCHP, which allows the firewall to get an IP address from the upstream device and connect to the network.
In the screenshot above you can see that protocol is UDP and we’ve got our device plugged into PORT 2. We’re using IPv4 only so we’ll create the rule as follows.
The source port in our traffic above is 68 and the destination port is 67 so we’ll open those in a new firewall rule.
Save and then Apply the changes.
Query the traffic for the interface two which we’ve plugged in the firewall again and now DHCP is allowed by our new rule.
No Route To Host
At this point, if you continue to check your logs on Firewall 1 and Firewall 2 to find out what else is blocked, you’ll find an error: “No Route To Host.”
That’s a topic I touched on before and will be covered in another post hopefully. On the date this post is published I’ll be teaching an Azure class so not sure how fast I’ll get to that one. You’re probably going to see some Azure topics before I get to that.
Follow for updates.
Teri Radichel
If you liked this story please clap and follow:
******************************************************************
Medium: Teri Radichel or Email List: Teri Radichel
Twitter: @teriradichel or @2ndSightLab
Requests services via LinkedIn: Teri Radichel or IANS Research
******************************************************************
© 2nd Sight Lab 2022
____________________________________________
Author:
Cybersecurity for Executives in the Age of Cloud on Amazon
Need Cloud Security Training? 2nd Sight Lab Cloud Security Training
Is your cloud secure? Hire 2nd Sight Lab for a penetration test or security assessment.
Have a Cybersecurity or Cloud Security Question? Ask Teri Radichel by scheduling a call with IANS Research.
Cybersecurity & Cloud Security Resources by Teri Radichel: Cybersecurity and Cloud security classes, articles, white papers, presentations, and podcasts
PFSense 6100 Setup Step By Step was originally published in Cloud Security on Medium, where people are continuing the conversation by highlighting and responding to this story.